Manage Users
Role-Based Access Control panel for managing user accounts, role assignments, and permissions within MiningOS.
RBAC Control
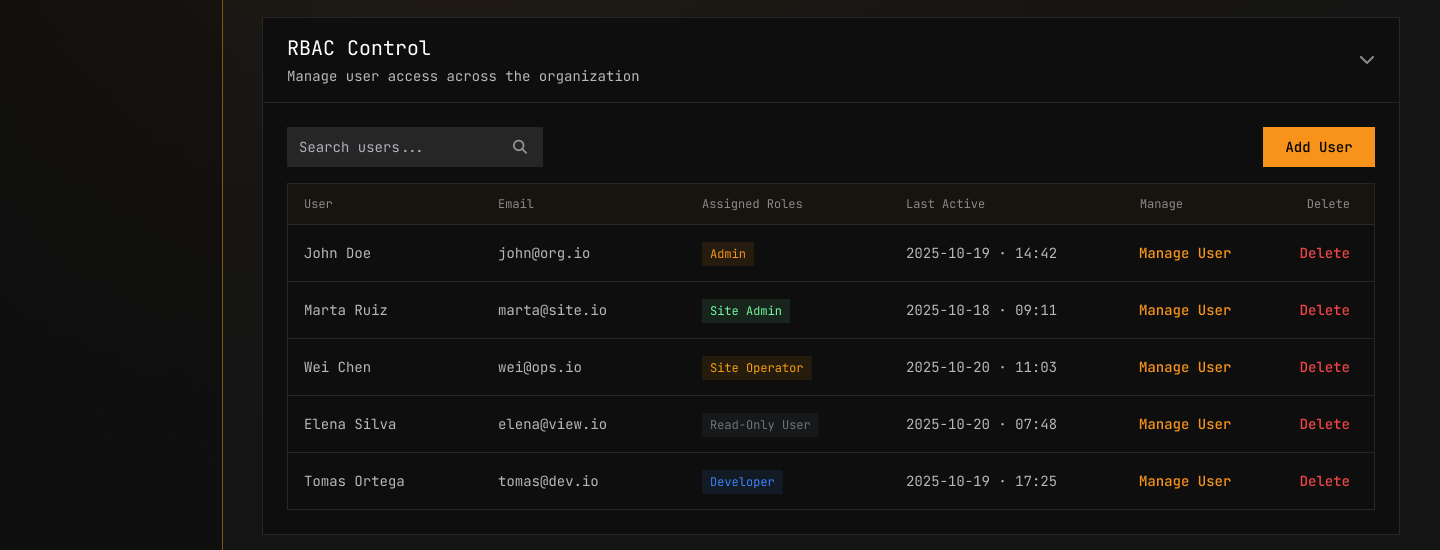
Manage user access across the organization. Each user can hold one or more roles. This panel is the central hub for viewing, adding, editing, and removing users and their role assignments.
Search Bar
Use the search bar to filter users by name or email address. The magnifying-glass input field filters the user table in real time as you type.
User Table
| Column | Type | Description |
|---|---|---|
| User | Text | Full name of the user (e.g., John Doe, Marta Ruiz, Wei Chen, Erica Silva, Pavel Ortega) |
| Text | User's email address (e.g., john@org.io, marta@site.io) | |
| Assigned Roles | Badge(s) | One or more role badges displayed inline (e.g., Admin, Site Admin). Each badge is a styled label indicating the user's granted role(s) |
| Last Active | Timestamp | Date and time of the user's most recent activity, formatted as YYYY-MM-DD · HH:MM (e.g., 2025-10-19 · 14:42) |
| Actions | Buttons | Two action buttons per row: Manage and Delete |
Role Badges
Each assigned role appears as a styled badge next to the user's entry. A user may have one or more role badges — for example, a user with both "Admin" and "Site Admin" roles displays two badges inline.
The available roles are assigned via the Manage User dialog. See Manage User for details on editing role assignments.
Actions Column
Each row in the user table provides two action buttons:
- Manage — Opens the Manage User dialog for that user. See Manage User for details on editing user information, roles, and reviewing effective permissions.
- Delete — Opens the Delete User confirmation dialog. See Delete User for details on the confirmation and permanent removal process.
The Delete action is irreversible. Deleting a user permanently removes their account, all access, and all assigned roles from the organization.
To add a user, see Add New User. To edit a user's role or review permissions, see Manage User. To remove a user, see Delete User.
Add New User
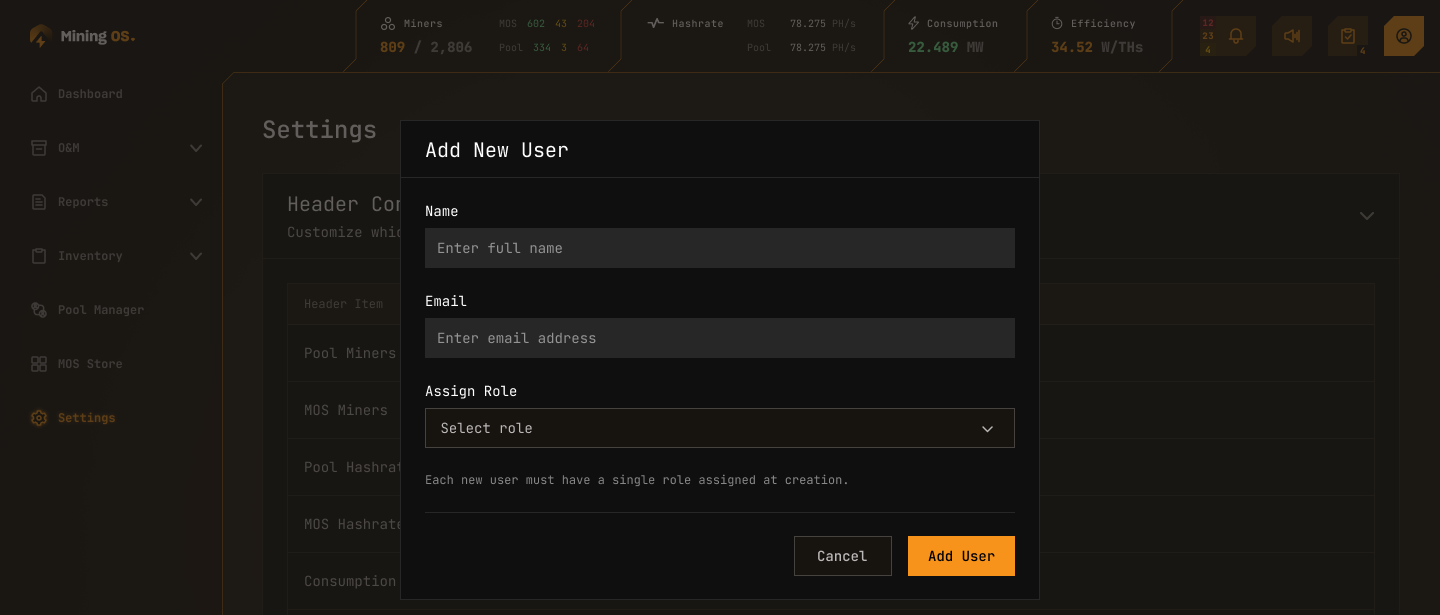
Click Add User above the user table to open this dialog. It collects the minimum required information to create a user account and assign an initial role.
Dialog Fields
| Field | Type | Placeholder Text | Description |
|---|---|---|---|
| Name | Text input | "Enter full name" | The user's full name as it will appear in the RBAC user table and across MiningOS |
| Text input | "Enter email address" | The user's email address, used for login and notifications | |
| Assign Role | Dropdown | "Select role" | A single role to assign to the user at creation time. The dropdown lists all available roles defined in the organization |
Each new user must have a single role assigned at creation. All three fields are required — the Add User button remains disabled until all fields are filled. To assign additional roles after creation, see Manage User.
Action Buttons
- Cancel — Closes the dialog without creating a user. No data is saved.
- Add User (primary button) — Submits the form and creates the new user account. The user immediately appears in the RBAC Control user table with the assigned role badge.
To modify a user's role or assign additional roles after creation, see Manage User.
Manage User
This dialog is opened from the Manage button in the RBAC Control user table. It provides three functional areas: editing user information, selecting a role, and reviewing the permissions that role grants.
User Information
Edit the user's basic details.
| Field | Type | Example Value | Description |
|---|---|---|---|
| Name | Text input (editable) | "Wei Chen" | The user's full name. Can be updated from this dialog. |
| Text input (editable) | "wei@ops.io" | The user's email address. Can be updated from this dialog. |
Changes to name or email are saved along with the selected role. These fields are not saved independently — they are committed together when Save Changes is clicked.
Assigned Role
Select the user's access level within MOS.
| Element | Type | Description |
|---|---|---|
| Role | Dropdown | Selects the user's access level within MiningOS. Displays the currently assigned role (e.g., "Site Operator") and lists all available roles in the organization. |
The permissions summary below updates automatically when changing this selection. You can preview the permission impact of a different role without saving first.
Effective Permissions
The actions available to this user as a [Role Name] (where the role name dynamically reflects the selected role in the dropdown above).
| Permission | Description | Site Operator Example |
|---|---|---|
| ManageSettings | Ability to modify Settings page controls (Header Controls toggles, Import/Export actions) | ✓ Granted |
| ManageRoles | Ability to create, edit, and delete user roles and their permission assignments | ✗ Denied |
| ImportSettings | Ability to import configuration files via the Import OS Settings dialog | ✓ Granted |
| ExportSettings | Ability to export the current MOS configuration as a JSON file | ✓ Granted |
| ViewSettings | Ability to view (read-only) the Settings page and its contents | ✓ Granted |
Visual indicators for each permission:
- Green checkbox (✓) — Permission is granted for the selected role
- Red cross (✗) — Permission is denied for the selected role
The permissions matrix is read-only in this dialog. Permissions are defined at the role level, not per-user — changing the role in the dropdown above changes which permissions are granted.
The current design shows 5 permissions. Additional permissions may exist depending on the deployment configuration. This is an open question for reviewers.
Action Buttons
- Cancel — Closes the dialog without saving any changes to user information or role assignment.
- Save Changes (primary button) — Commits all modifications: updated name, updated email, and the newly selected role. The RBAC Control table refreshes to reflect the changes immediately.
To create a new user instead, see Add New User. To remove a user entirely, see Delete User.
Delete User

This dialog appears when clicking the Delete button on a user row in the RBAC Control user table. It is a confirmation step that prevents accidental removal of user accounts. The dialog blocks interaction with the rest of the page until dismissed.
Confirmation Prompt
The dialog body displays a confirmation message:
- Primary prompt — "Are you sure you want to delete [User Name]?" — where [User Name] is dynamically populated from the selected row in the RBAC Control table (e.g., "Are you sure you want to delete Wei Chen?").
- Body text — "Deleting this user will permanently remove all their access and assigned roles. This action cannot be undone."
Deleting a user permanently removes their account and role assignment from MiningOS. The user will immediately lose access to all features governed by their previous role.
What Deletion Entails
When a user is deleted:
- The user's name, email, and role assignment are removed from the system.
- Any active sessions for that user are invalidated immediately.
- The user will no longer appear in the RBAC Control table after deletion.
This is a destructive action. There is no way to restore a deleted user — they must be re-added manually via Add New User with a fresh role assignment.
Action Buttons
- Cancel — Closes the dialog without deleting the user. The RBAC Control table remains unchanged.
- Delete (destructive/red button) — Confirms the deletion. The user is removed immediately and the RBAC Control table refreshes to reflect the change.
The Delete button uses a red/destructive visual style to signal the irreversible nature of the action.
This dialog is triggered from the Delete button in the RBAC Control user table. To modify a user's role or information instead of removing them, see Manage User. To re-add a user after deletion, see Add New User.