O&M: Adding & Updating Miners
Complete miner lifecycle management from initial registration through maintenance and retirement.
This guide covers the complete lifecycle of miner management in MiningOS—from initial registration through maintenance and eventual retirement. All miner operations are performed through the container's Layout page or the Explorer.
For supported miner models and specifications, see Supported Devices. For the system architecture and how miners are tracked, see Architecture Guide.
Quick Navigation
| Task | Section |
|---|---|
| Add a new miner to a container | Register a New Miner |
| Move a miner between positions | Change Miner's Position |
| Update MAC, S/N, or tags | Change Miner Information |
| Send miner to repair lab | Take Miner to Maintenance Lab |
| Return miner from repair | Bring Back Miner from Maintenance Lab |
| Fix network/IP issues | Force Set New IP |
| Configure static IPs | Manual Set of IPs |
| Permanently delete a miner | Remove Miner Permanently |
| Register miner outside container | Register a Miner Directly in Maintenance Mode |
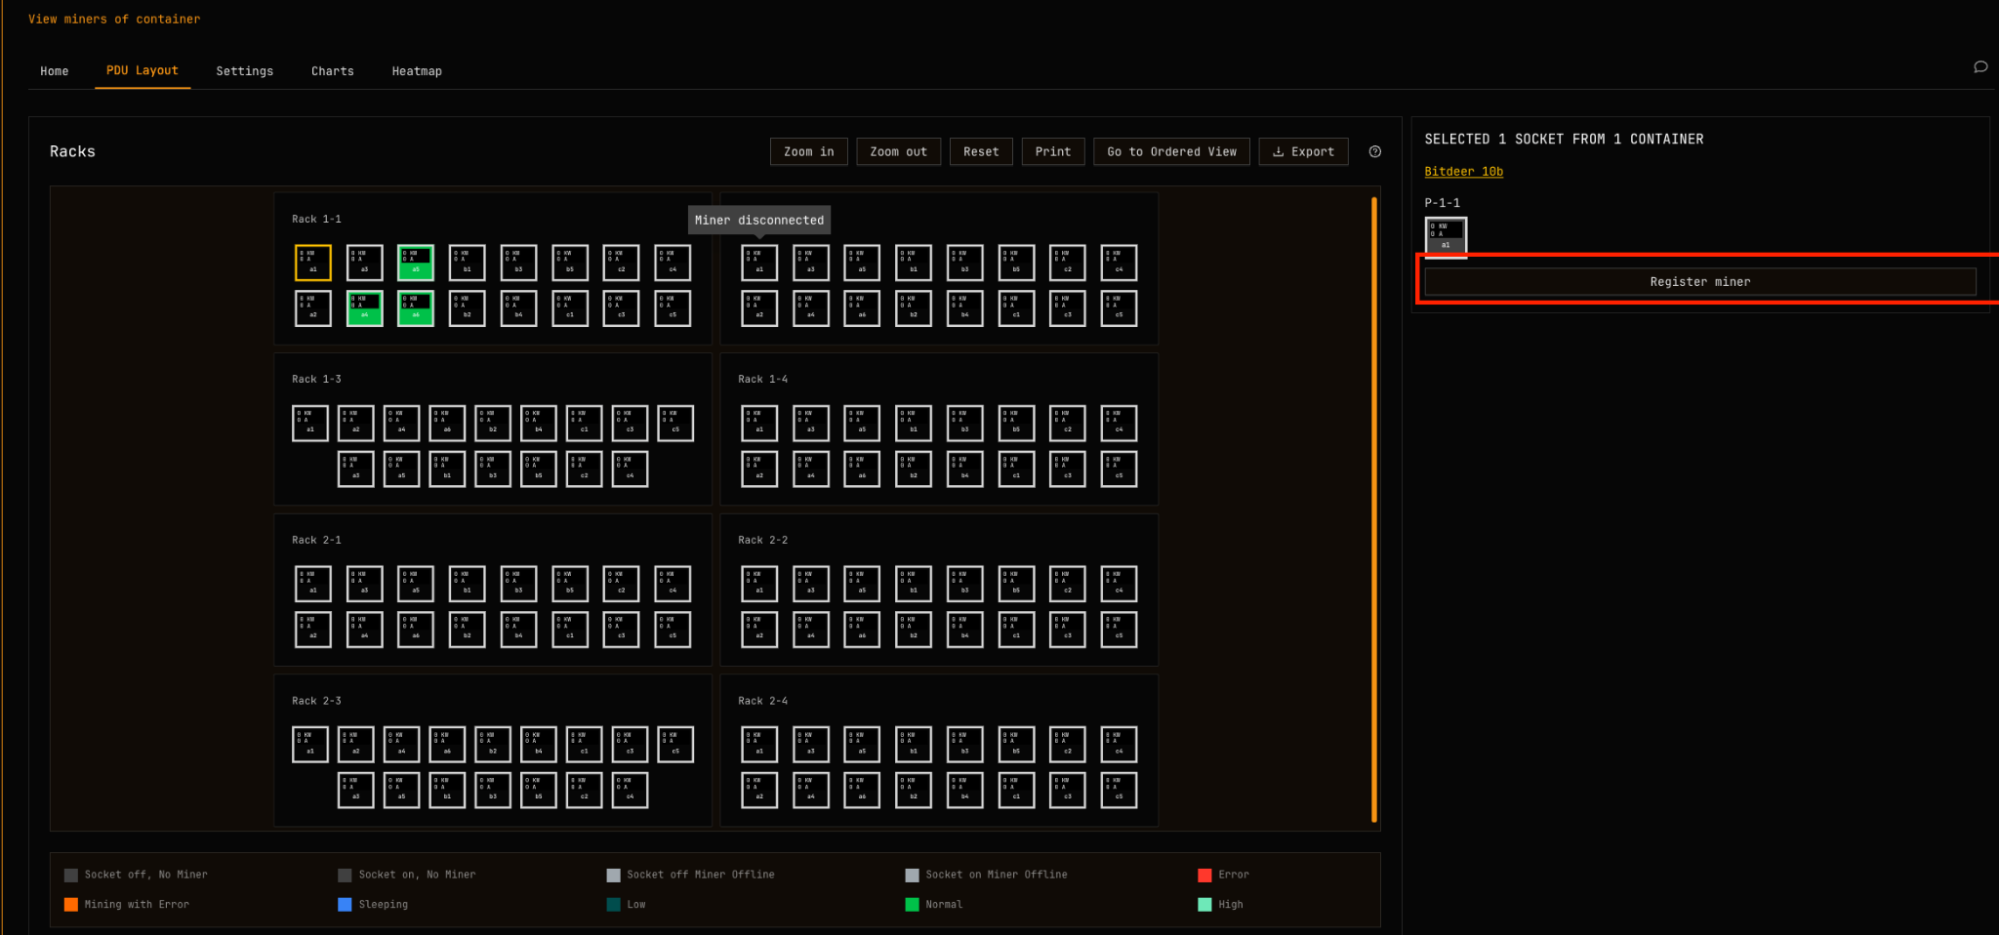
Register a New Miner
-
Go to container's Layout page > Edit. See Bitdeer PDU Layout or Antspace PDU Layout for layout examples.
-
Click on one of the available sockets.
-
Fill in the form with the new miner's data.
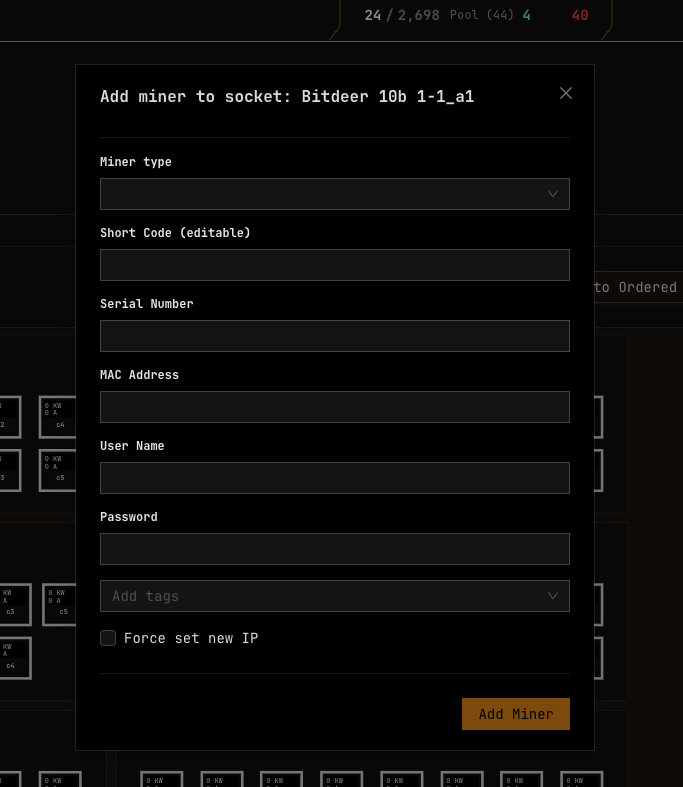
MAC Address Format: Use hexadecimal values with lowercase letters and colons (e.g.,
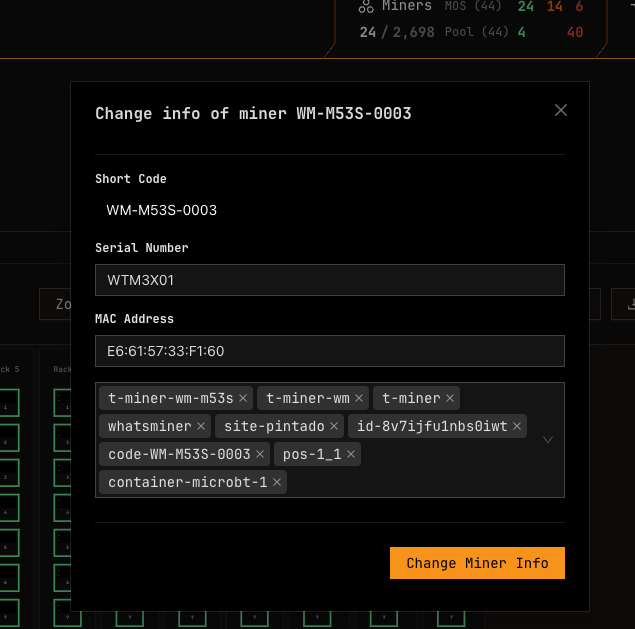
cc:54:15:00:0e:a1). MiningOS displays MAC addresses in uppercase for readability.Automatic Tags: MiningOS creates tags for site, miner type, miner ID, container, and position. Add custom tags as needed. See Explorer Tag Syntax for tag conventions.
Force Set New IP: If the miner's IP is not accessible, enable this checkbox. See Force Set New IP for details.
-
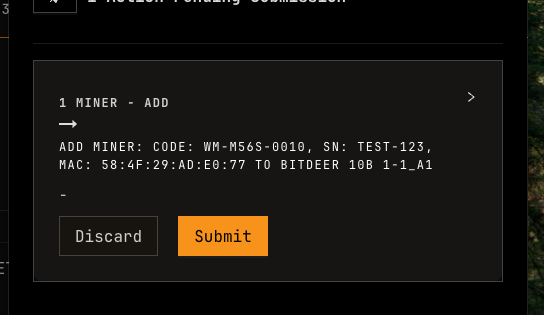
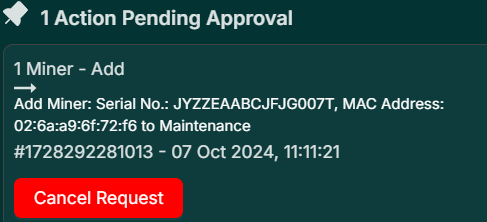
This is a double-authorization action. Submit for approval per the Requests & Approvals workflow.
-
Wait a few seconds to confirm creation, then click Save to return to the Layout page.
For RPC-based miner registration (backend operations), see Installation Guide — Register Workers and Mock Devices.
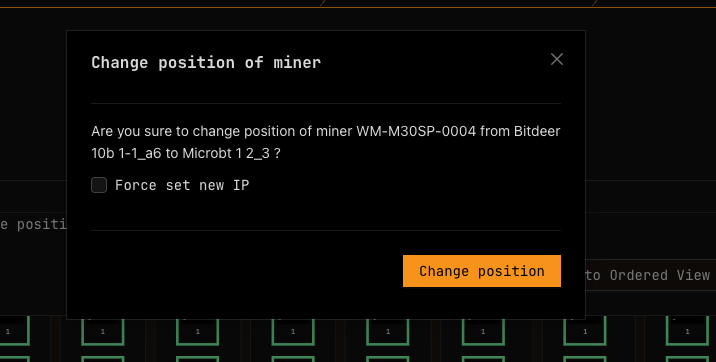
Change Miner's Position
-
Go to container's Layout page > Edit.
-
Click the miner you want to relocate.
-
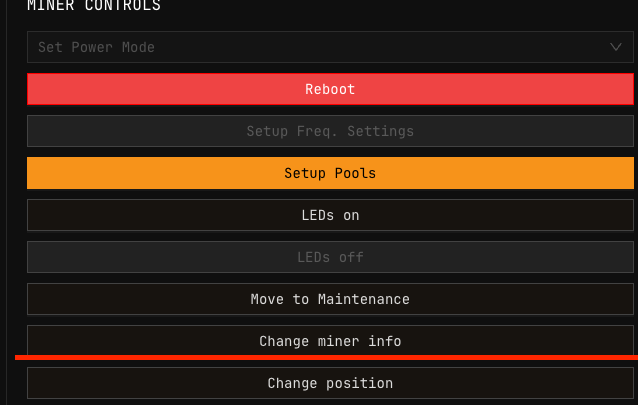
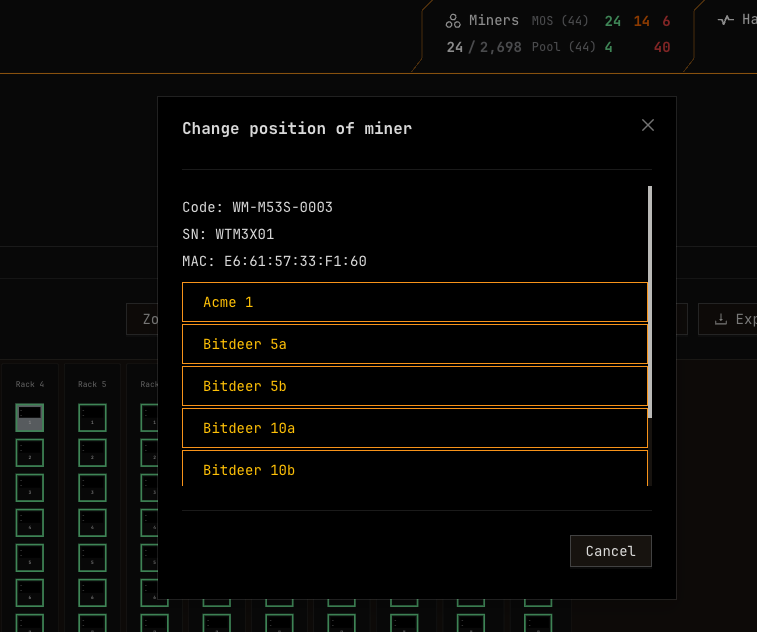
Click Change position.
-
Select the destination container (only containers compatible with this miner model are shown). For container compatibility, see Supported Devices — Containers.

-
Select an available socket and click Change position.
Change Miner Information
-
Go to container's Layout page > Edit.
-
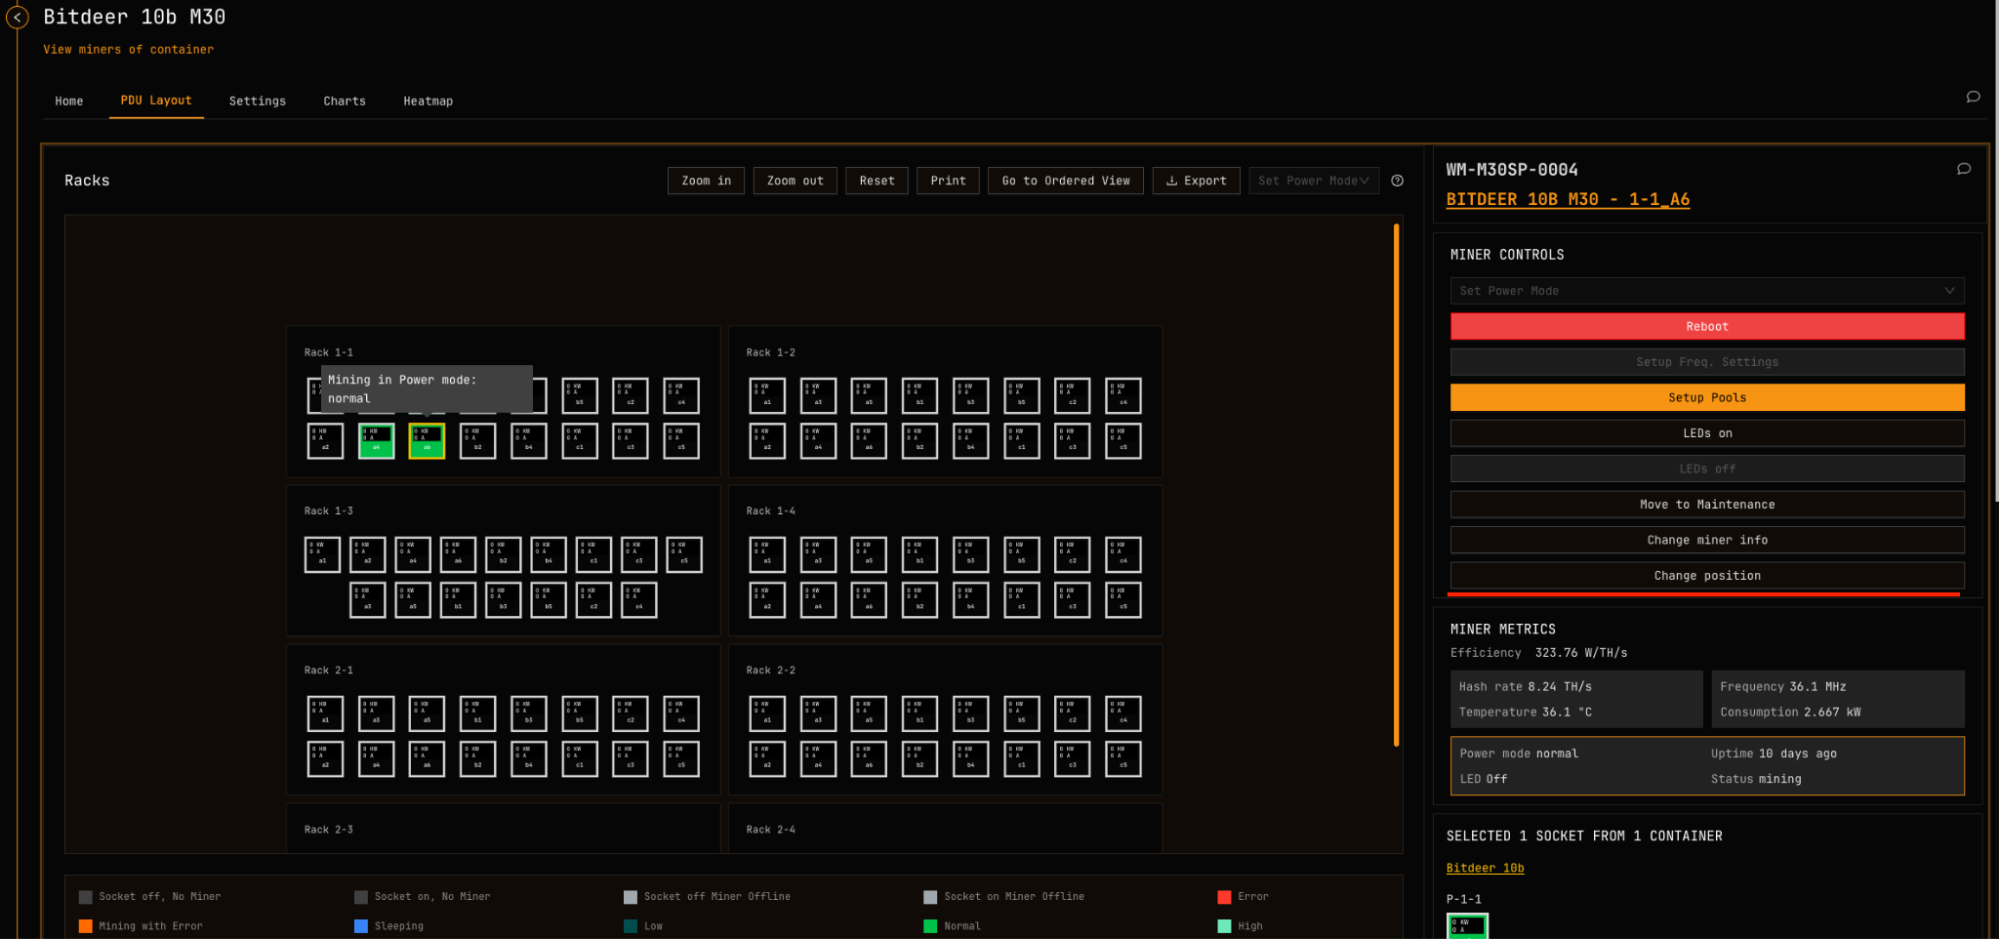
Select the miner > Change Miner Info.
-
Update the Serial Number, MAC address, and/or tags.
For miner short codes and naming conventions, see Miner Short Codes.
Take Miner to Maintenance Lab
-
Go to container's Layout page > Edit.
-
Click the miner to remove.
-
Click Maintenance.
-
Confirm you want to move this miner to the maintenance lab.
-
Verify the socket is now available, then click Cancel to return to the Layout page.
View all miners under maintenance in the Inventory Module. The list includes CSV export functionality.
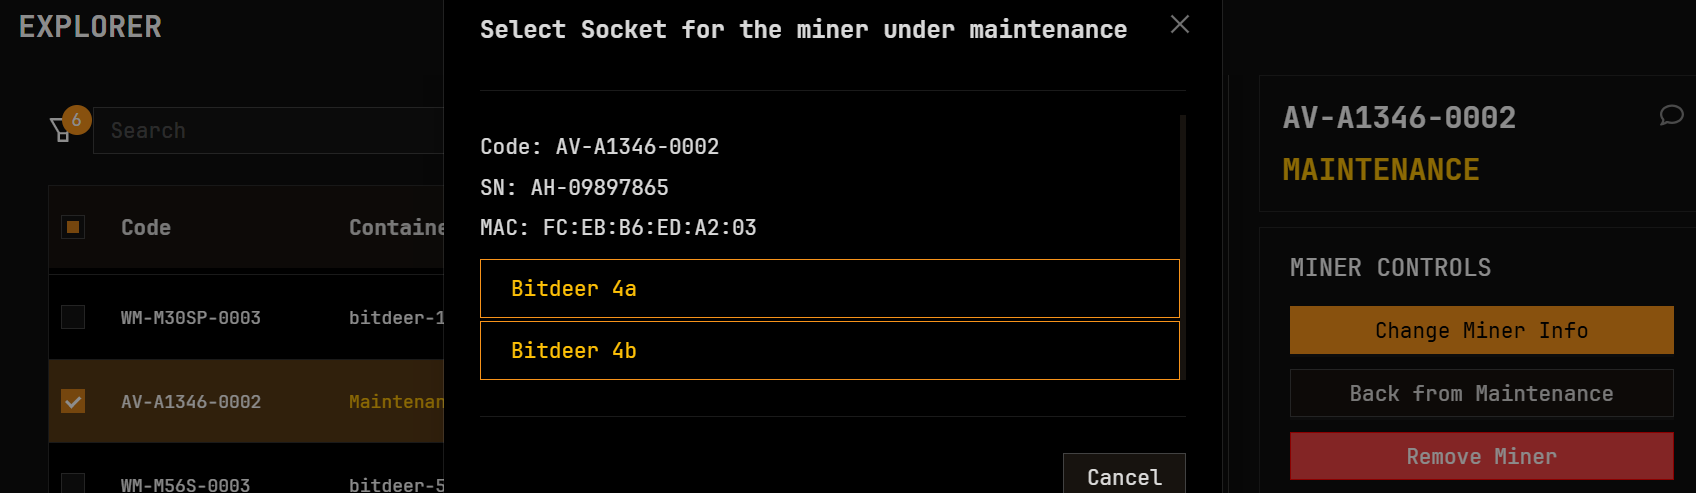
Bring Back Miner from Maintenance Lab
-
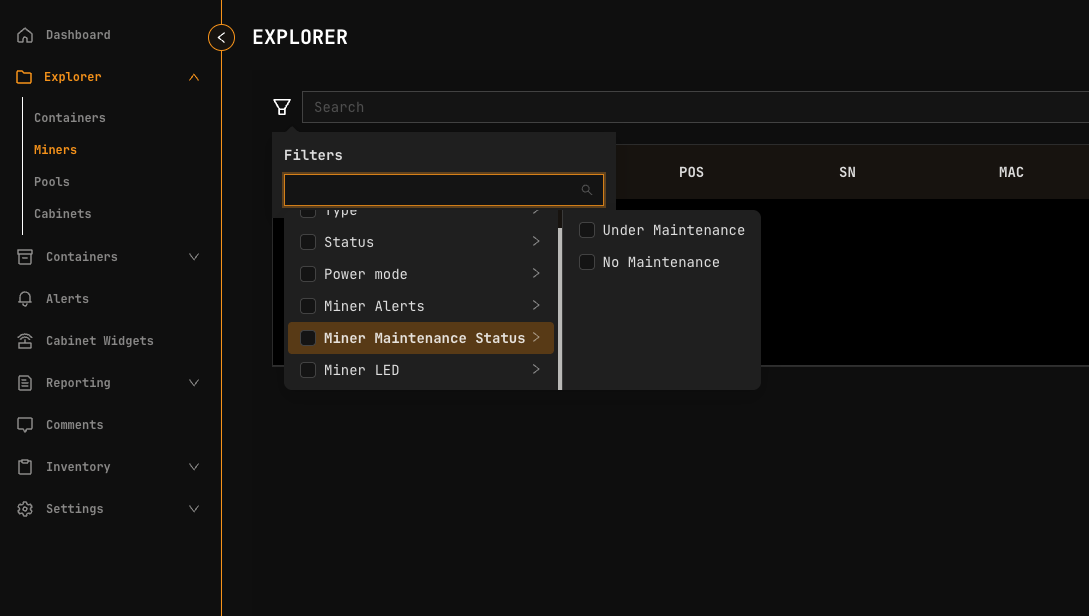
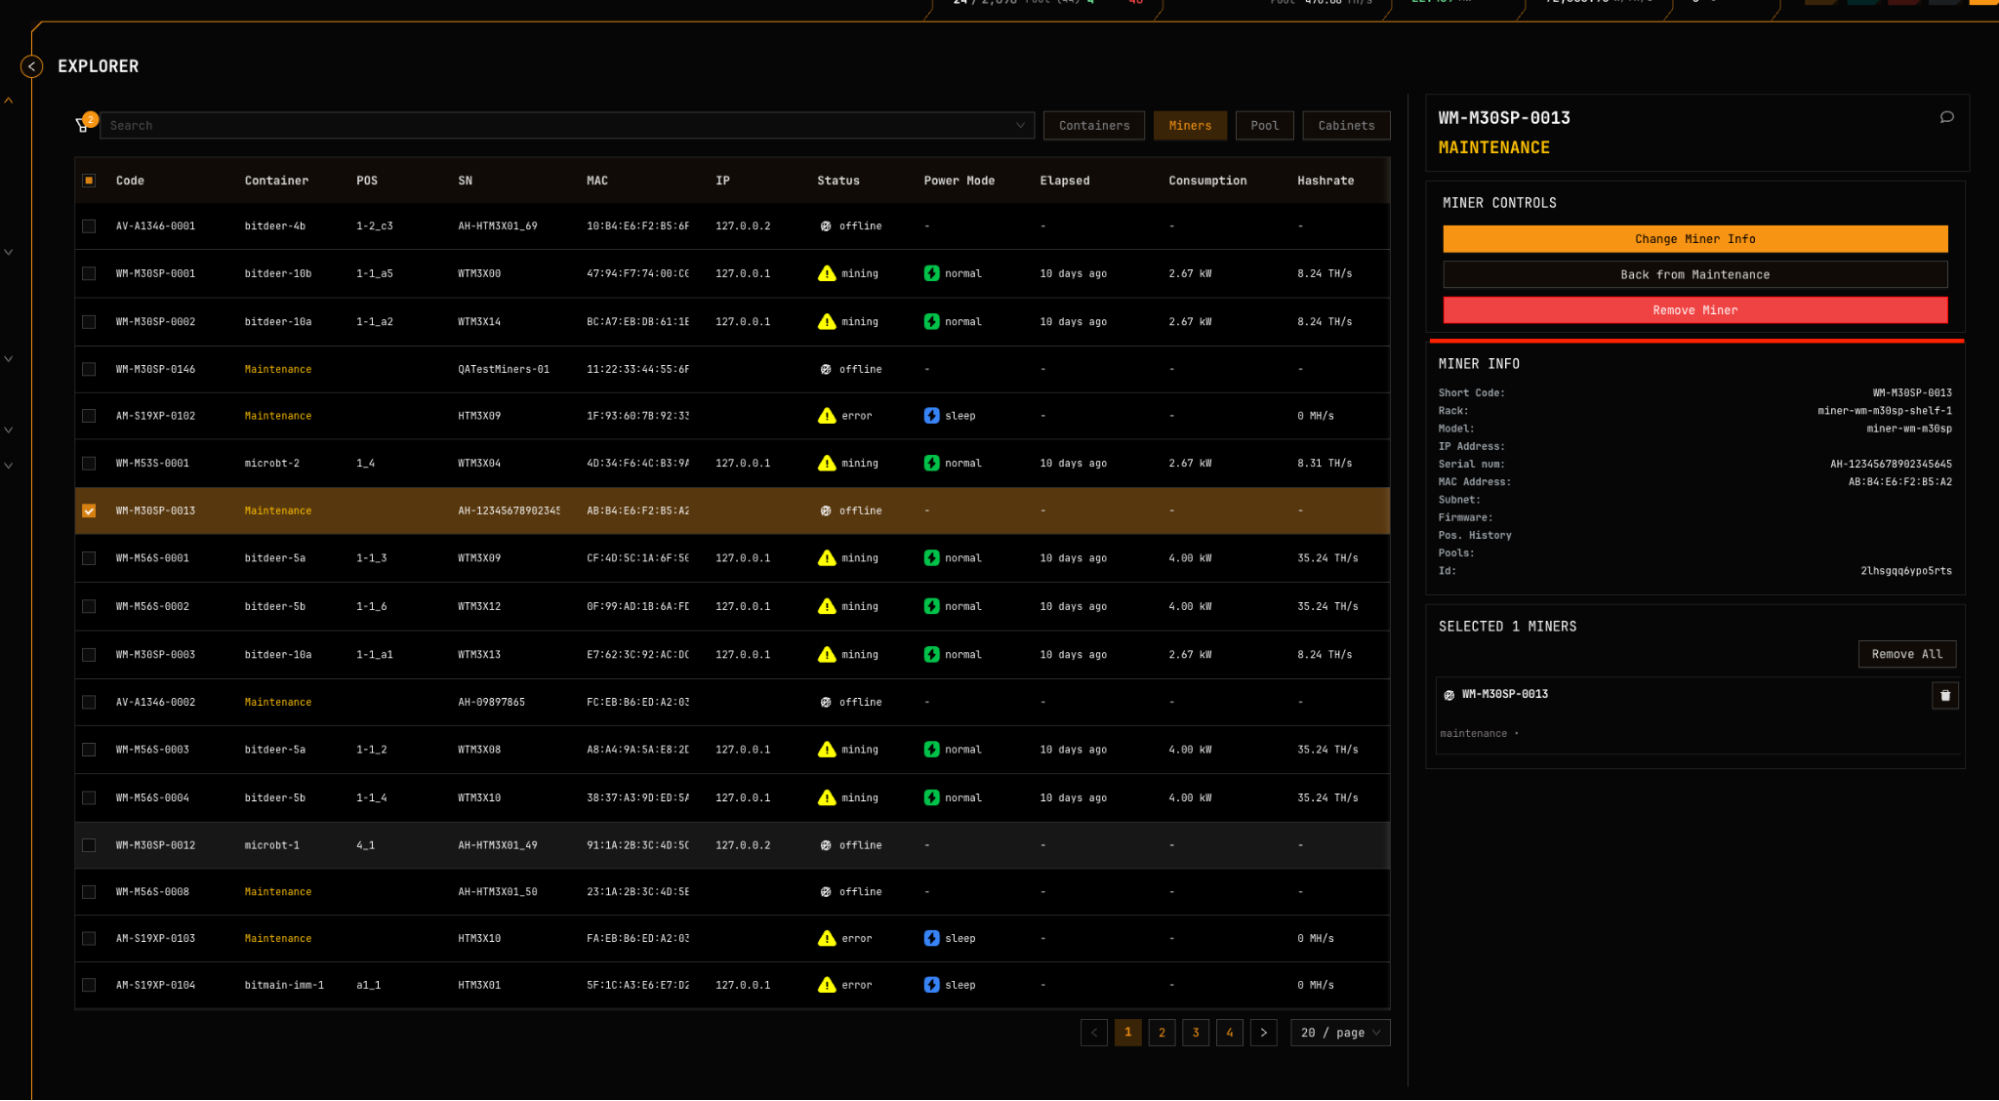
Go to Explorer > Filter for Miners Under Maintenance. Or search by miner ID with the
id-prefix (e.g.,id-bsns3yh4kcvfvdd).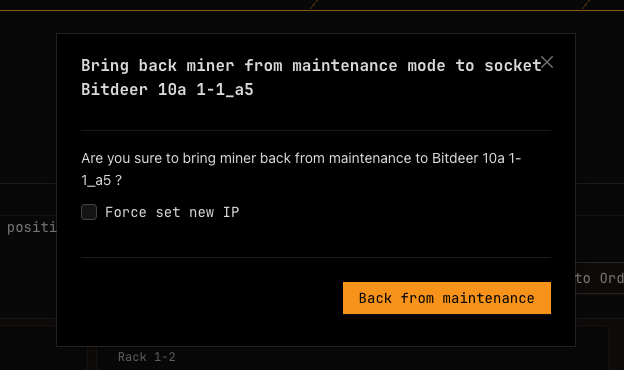
-
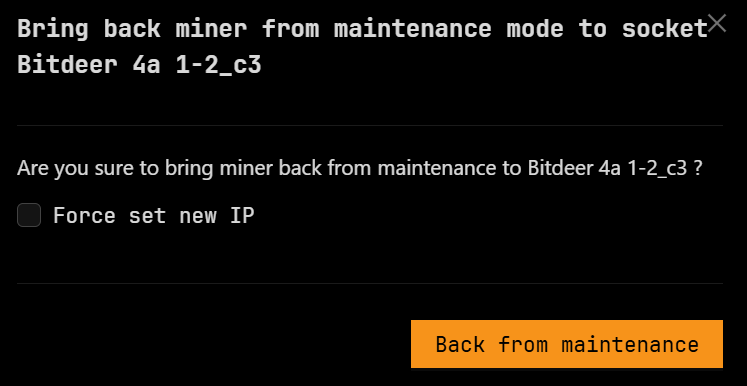
Select the miner and click Back from Maintenance.
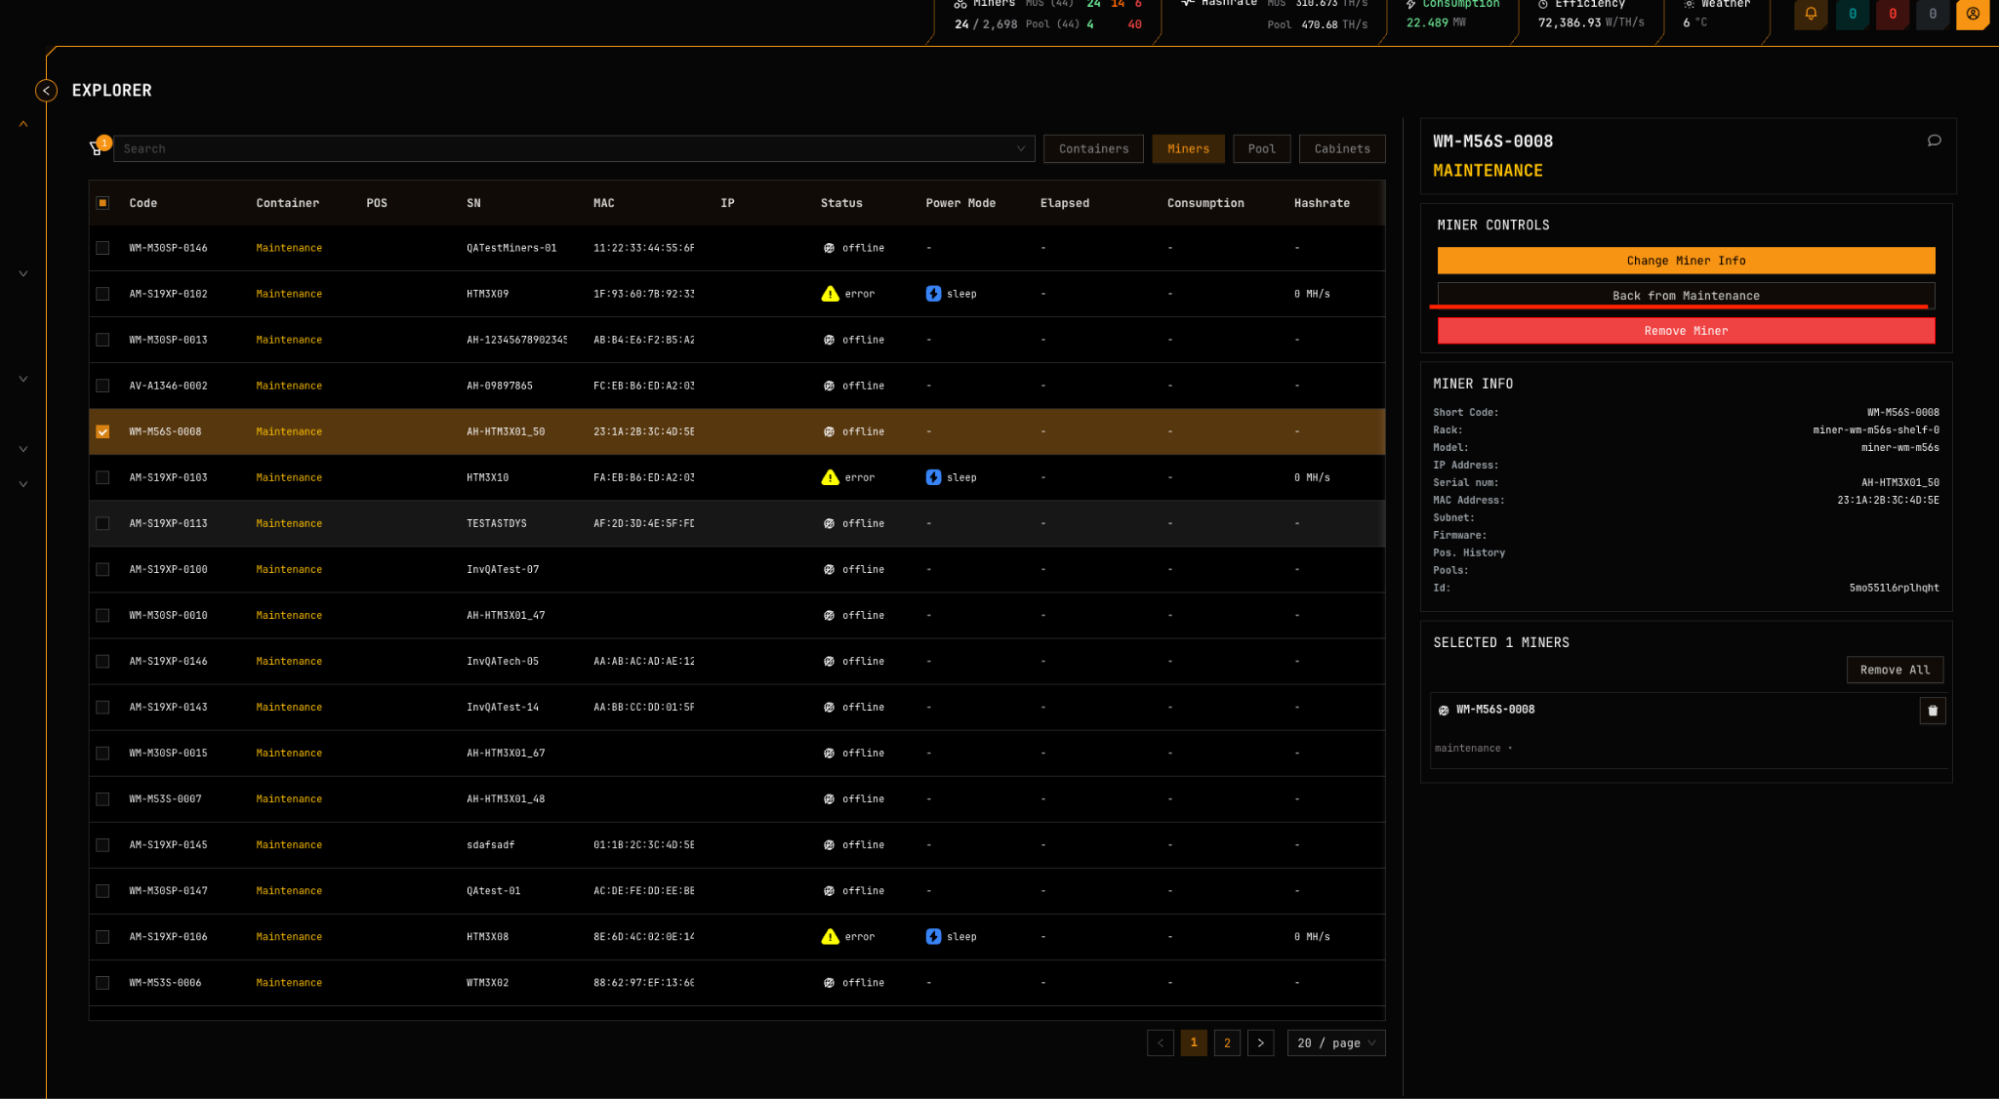
Position History: Click POS History to view this miner's previous container positions.
-
Select the destination container (only compatible containers are shown).
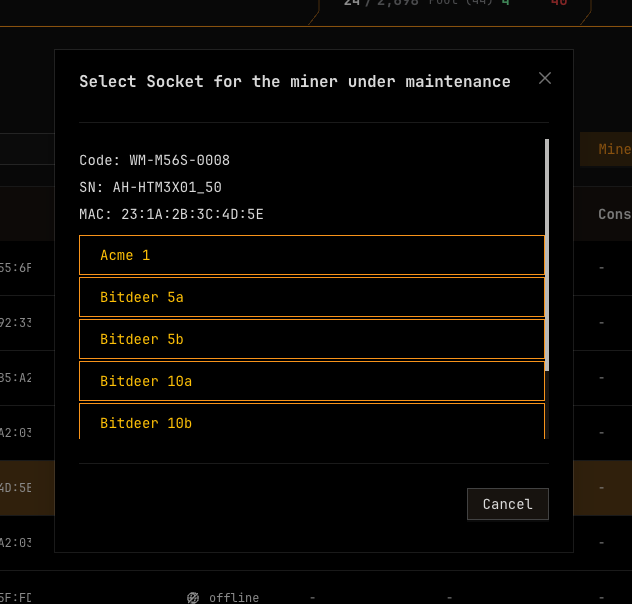
-
Select an available socket and click Back from maintenance.
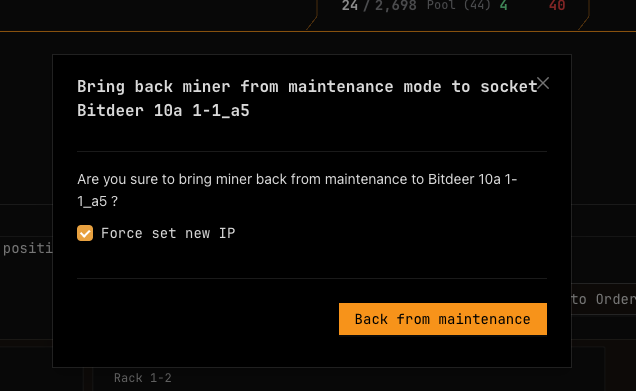
If the miner's network card or MAC address changed during repair, enable Force set new IP. See Force Set New IP.
-
Verify the miner appears in the destination position, then click Cancel to return to the Layout page.
Force Set New IP
Use Force Set New IP when a miner shows status Offline after registration or maintenance due to network configuration changes.
When to use:
- Miner's network card was replaced during repair
- Miner's MAC address changed
- Miner was moved to a different network segment
Before using Force Set New IP, verify the correct RackId is selected.
Manual Set of IPs
Depending on site configuration, MiningOS assigns IPs automatically (DHCP) or manually (static). For DHCP worker setup, see Installation Guide.
Static IP Format
When manual IP assignment is enabled, addresses follow the format 10.A.B.CD /8:
| Segment | Range | Description |
|---|---|---|
| A | 0–32 | Container number (0 = repair/monitoring) |
| B | 1–3 | Cupboard |
| C | 1–6 | Shelf |
| D | 1–9 | Position on shelf |
IP Assignment Behavior
- When registering or returning a miner, MiningOS prefills the IP for that socket
- Position changes automatically update the IP unless you use Force Set New IP
- System administrators can upload CSV files to populate miner IPs during installation
External DHCP (L3 Switches)
Some sites use strict DHCP where IPs are assigned by L3 switches based on MAC addresses. In this configuration:
- Operators maintain a MAC-to-IP mapping table in the switches
- Position changes require updating the switch configuration
- Use Force set new IP in MiningOS to match the externally assigned IP
If the IP in MiningOS doesn't match the actual device IP, the miner will show as Offline.
Remove Miner Permanently
Permanent Action: Removed miners cannot be recovered. Only remove miners that are scrapped and will never be used again.
-
Go to Explorer > Filter for Miners Under Maintenance.
-
Select the miner and click Remove Miner.
When to Remove a Miner
| Scenario | Action |
|---|---|
| Miner accidentally registered as new (duplicate) | Remove the duplicate entry |
| Control board replaced during repair | Remove old entry, register as new with updated MAC |
| Miner is physically scrapped | Remove permanently |
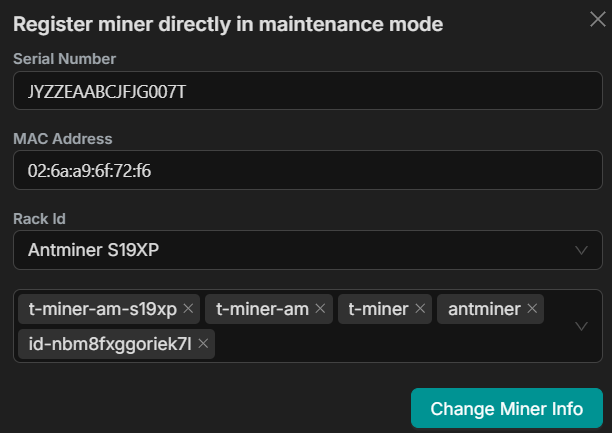
Register a Miner Directly in Maintenance Mode
Use this workflow to add miners to inventory before deploying them to a container—useful for receiving shipments or pre-staging equipment.
-
Go to Settings > Register a miner directly in Maintenance mode.
-
Fill the form and submit. This requires double authorization.
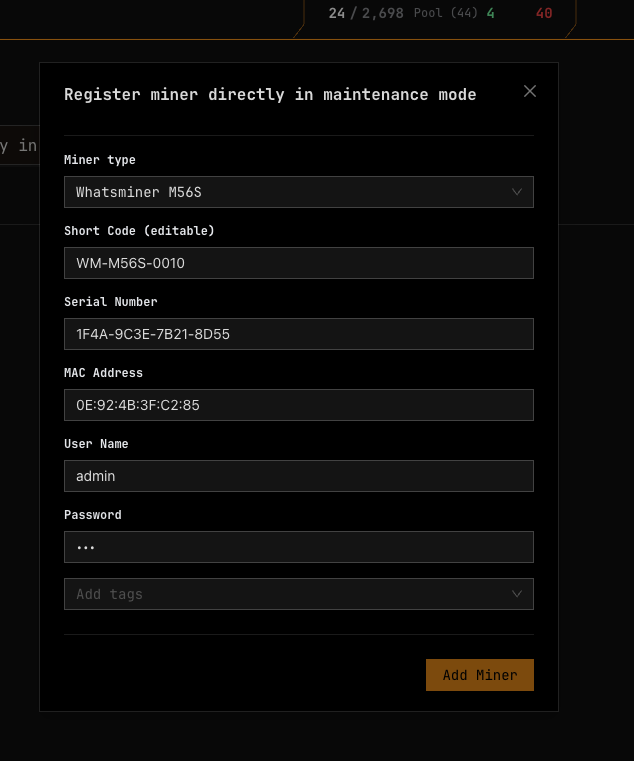
MAC address is optional for maintenance registration. Add it later via Change miner info before deploying to production.
-
Verify creation by searching in Explorer using short code, S/N, or MAC address.

-
If needed, select the miner and go to Miner controls > Change miner info to add missing details.

-
To deploy, follow Bring Back Miner from Maintenance Lab.
Container Compatibility: MiningOS shows containers that accept the miner's RackId type. For example, a MicroBT container accepts both M53 and M56 miner subtypes. See Supported Devices — Containers for compatibility details.
Force Set New IP: Use this when a pre-existing miner's MAC address changed during repair or when deploying to a different network segment.
Related Documentation
Operator Manual
- Explorer — Search and filter devices, tag syntax
- Container Example: Bitdeer — PDU layout and container controls
- Container Example: Antspace Hydro — Antspace-specific operations
- Requests & Approvals — Authorization workflow
- Inventory Module — Spare parts and repair tracking
- Comments — Adding notes to devices
- Alerts Manual — Monitoring miner alerts
Architecture & Technical Reference
- Architecture Guide — System overview and worker hierarchy
- Supported Devices — Miner models and specifications
- Installation Guide — Worker setup and RPC registration
External Resources
- Bitmain Antminer Support — Firmware, specifications, troubleshooting
- MicroBT Whatsminer — Product documentation
- Canaan Avalon — Avalon miner resources